Experiment: How to make the boldest, brightest tie-dye!
Explore how different fiber types react with dye to find out which works best

If you want to create a tie-dyed shirt, it helps to understand fabric dyes, like the ones explored in this experiment.
ElementalImaging/Getty Images
From the shrouds of mummies in ancient Egypt, to the ball gowns of ladies in the Victorian era, to the tie-dyed shirts of hippies, dyed cloth has played an important role in human society.
Early dyes were made using natural resources, such as plants, berries, minerals and seeds. Some of the earliest examples of cloth dyed with these natural substances come from ancient Egypt during the time of the New Kingdom, during the reigns of pharaohs like Queen Hatshepsut and King Tutankhamen. Archeological finds from China and India also contain early examples of dyed cloth. During ancient times, the cloths, just like the dyes, were made from a natural resource — natural fibers, such as cotton, linen and wool.
Later, as advancements were made in chemistry and manufacturing, humans learned to make other fibers, such as polyester, nylon and rayon, which are known as synthetic fibers. Today’s dyes are also different. They are often synthesized (made) by chemists. By understanding how the molecules of dye react with the fibers, chemists can design many vibrant and color-fast dyes. (“Color-fast” means the dyed color does not fade or run off when washed.)
In addition to what type of material they are made from, another way to categorize fibers is by their chemistry. Cotton and linen fibers are cellulose-based. Cellulose is the main component of plant cell walls. Cotton fabric is made from cotton plants and linen is made from flax plants. Wool and silk are both animal-protein-based natural fibers. Wool is made from the hair of animals (usually sheep), and silk is made from silkworm cocoons.
Some dyes react best with cellulose-based fibers, forming permanent covalent chemical bonds with cellulose. Others react better with protein-based fibers. In addition, some synthetic fibers are chemically similar to certain natural fibers — such as nylon, which is similar in structure to protein-based fibers, and rayon, which is manufactured using cellulose. This affects which dyes react best with the different synthetic fibers.
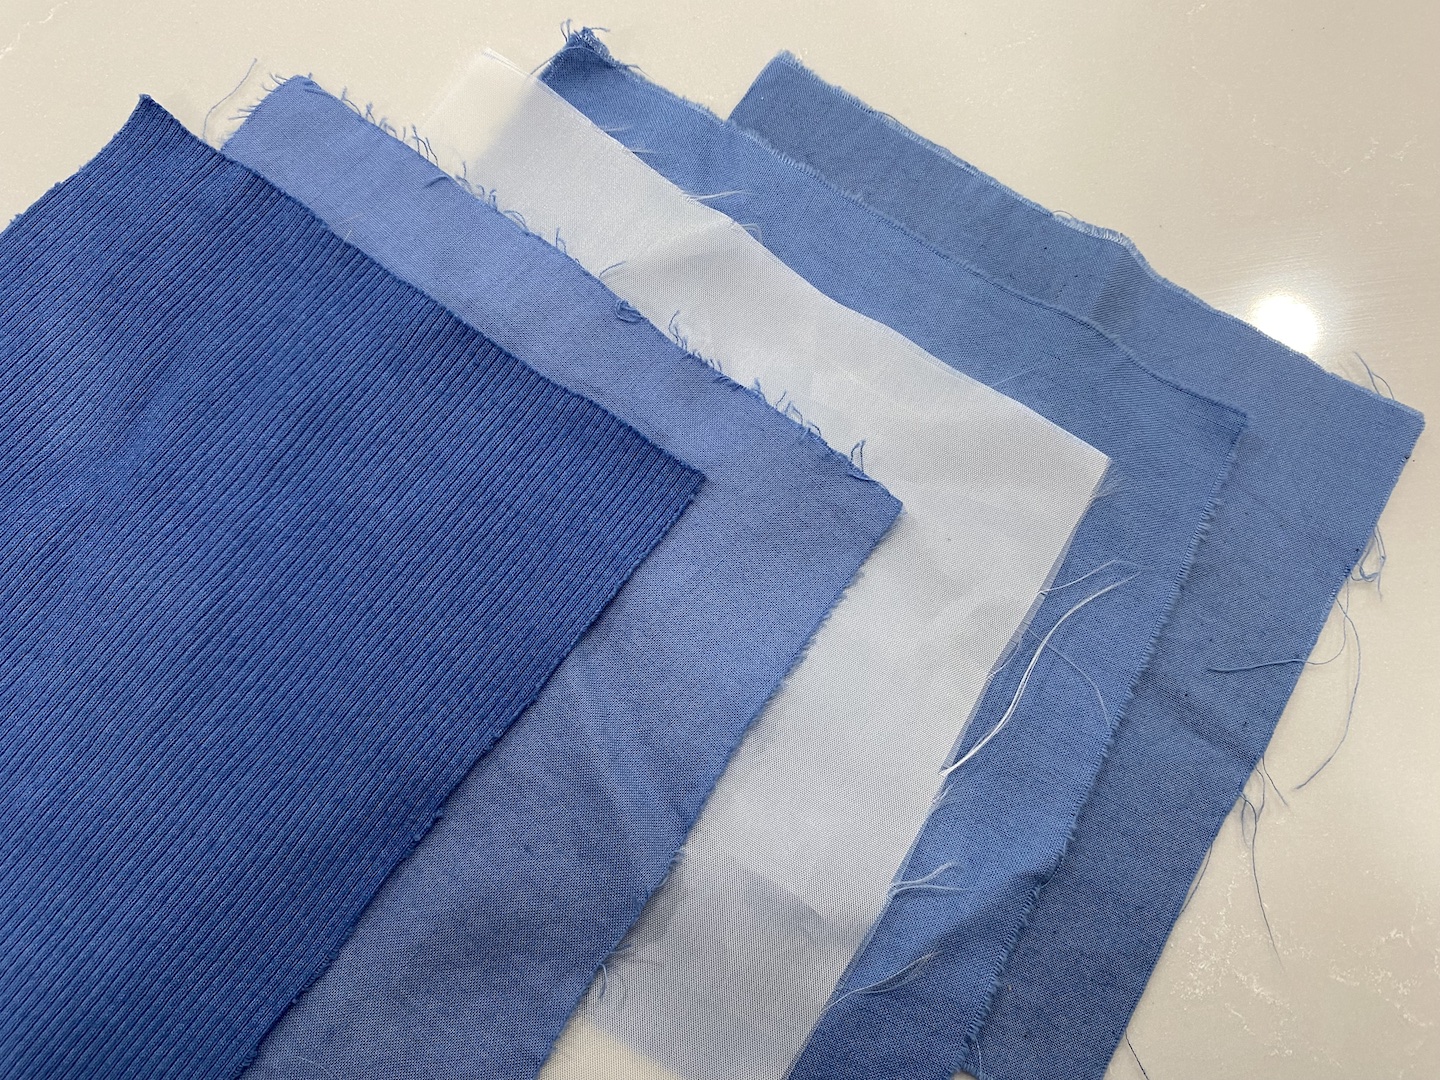
Overall, how a certain fabric becomes dyed by a specific dye all comes down to the chemistry involved. For example, Figure 1 shows how different types of white fabric looked after being dyed using the same blue dye.
In this chemistry science project, you will study one type of dye — called fiber-reactive dye — by dyeing several different types of fabrics with the same dye. Which fiber types will react most strongly with the fiber-reactive dye? You will judge the results by comparing the colors of your fabric samples.
One quantitative way to categorize colors is by hue, saturation and brightness. The resource list, below, has references to get you started on your research about dye and fabric chemistry, as well as color. So read up, formulate your hypothesis and start coloring. Who knows, in the end you might be able to put your newfound understanding of fabric dyes to work to create the ultimate tie-dyed shirt!
Terms and concepts
- Natural fiber
- Synthetic fiber
- Molecule
- Cellulose
- Protein
- Covalent chemical bonds
- Fiber-reactive dye
- Hue
- Saturation
- Brightness
- pH
- Water solubility
- Soda ash
Questions
- What are the different types of fibers and how are they made?
- What types of dyes are used for different textile fibers? Why?
- What is the chemistry behind fiber-reactive dyes?
- How can colors be quantitatively described?
- How do factors like pH and water solubility affect dyeing?
Resources
These websites offer information about the history of dyeing cloth, types of fibers and textiles, types of dyes and the chemistry of fiber-reactive dyes:
- Burch, P.E. (2009, December 18). About the Dyes. Paula Burch’s All About Hand Dyeing. Retrieved February 15, 2013.
- Dharma Trading Co. (n.d.). Fiber Reactive Dye Chemistry: Quick Explanation Of The Chemical Processes Involved In Tie-Dyeing. Retrieved June 18, 2009.
- Christie, R.M. (2001). Colour Chemistry. Cambridge: Royal Society of Chemistry (1 edition).
Consult this reference for information on describing color with hue, saturation and brightness:
- Jewett, T. (n.d.). HSB: Hue, Saturation, and Brightness. Retrieved February 15, 2013.
The following resource can be used to convert units used in the United States to metric units:
- Science Made Simple, Inc. (n.d.). Metric conversions & U.S. customary unit conversion calculator. Retrieved February 15, 2013.
The following tool can be used to interpret your results from this science project by determining the hue, saturation and brightness of each fabric sample:
- Vargas, J. (n.d.). Color Picker. Retrieved February 11, 2014.
Materials and equipment
Note: The fiber-reactive dye powder, soda ash and textile detergent listed below are all specialty items. You may be able to purchase them at a local craft and/or fabric store, such as Jo-Ann Fabric and Craft. If not, they are available from online vendors like the Dharma Trading Co.
Caution: You will be working with substances containing soda ash (sodium carbonate), which is caustic. Materials that come into contact with soda ash, which includes the measuring cup, measuring spoons, plastic container and glass jar, should not be used for food storage or cooking afterward.
- Five different types of white fabric samples. Purchase enough to make at least three 20 x 20 centimeter (8 x 8 inch) squares of each type. We recommend including a linen sample and a pure polyester sample. Possible types of fabric include:
- Cotton
- Linen
- Wool
- Rayon
- Nylon
- Polyester
- Cotton-polyester blends
- Permanent marker
- Scissors
- Ruler (metric)
- Optional: Newspaper or pieces of paper
- Measuring cup. Caution: This measuring cup should not be used for cooking afterward.
- 1/2 cup textile detergent, especially formulated for removing non-bound dye particles from freshly dyed fabric. Can be purchased online; Dharma Trading Co. offers the most common brand, Synthrapol, catalog #SYNPT, as well as their own, nontoxic alternative, the Dharma Professional Textile Detergent, catalog #PTD16. Alternatively, laundry detergent may be used.
- Newspaper or rags
- Old clothes that can be stained
- Safety goggles
- Rubber gloves
- Clean glass jar (10 oz. or larger). Caution: This jar should not be used for food or beverage afterward.
- Measuring teaspoon and tablespoon. Caution: These measuring spoons should not to be used for cooking afterward.
- 2 tsp. fiber-reactive dye powder, such as Tulip Permanent Fabric Dye or Procion Pro MX Reactive Dye. Note: Your results might be easier to interpret if you use a bold color such as red, blue or green. Pastel colors and yellows might be more difficult to evaluate.
- 1 Tbsp. salt
- Three 1-gallon sealable plastic bags
- Timer or clock
- 1 Tbsp. soda ash. Alternatively, Arm & Hammer Super Washing Soda, which may be found in the detergent section of a grocery store, can be used.
- Plastic container (must be able to hold at least 3 cups). Caution: This container should not be used for food or beverage afterward.
- Optional: Camera
- Lab notebook
Experimental procedure
Important notes before you begin:
- Do your background research so you are knowledgeable about the terms, concepts and questions in the Background section. In particular, you should learn about the different fiber types used in fabrics and about fiber-reactive dye chemistry.
- Pick several different types of fabric to dye. Try at least five. Use your background research to make predictions about how well different fabric types will be dyed with fiber-reactive dyes.
- For convenience of doing this science project using household measuring tools, volumes are given in terms of U.S. measuring spoons and cups. However, science is done in metric units and you may need to convert when writing up your procedure. To convert units, you can use the following website: Science Made Simple, Inc. (n.d.). Metric conversions & U.S. customary unit conversion calculator.
Dyeing the fabric samples
- For each fabric type, cut out three 20 x 20 centimeter (8 x 8 inch) squares.
- Use the permanent marker to label each of the squares with its fabric type. For each fabric type, number each square (1 through 3). Your squares should now look similar to the ones in Figure 2 on the Science Buddies website.
- Permanent marker may leak through some types of fabric, so if you are working on a surface that should not be stained, you should label the fabrics on top of newspaper or pieces of paper.
- Pre-wash the fabric squares by putting them in a normal clothes washing machine with 1/4 cup of the textile detergent. Wash using hot water, if possible. Allow the fabric squares to air dry.
- The pre-washing removes any residual chemicals on the fabrics from the fabric manufacturing process that might interfere with the dyeing process.
- You will be handling the fiber-reactive dye powder next. Before opening the dye packet, cover the area you will be working on with newspaper or rags so that you will not stain it. You may want to work outside to avoid staining something. Also put on old clothes that you would not mind staining.
- Put on gloves and safety goggles.
- Caution: Dyes often contain soda ash (sodium carbonate). Soda ash is caustic. Wear goggles and gloves when mixing the dye solution, mixing the soda ash solution and rinsing the fabric sample after dyeing.
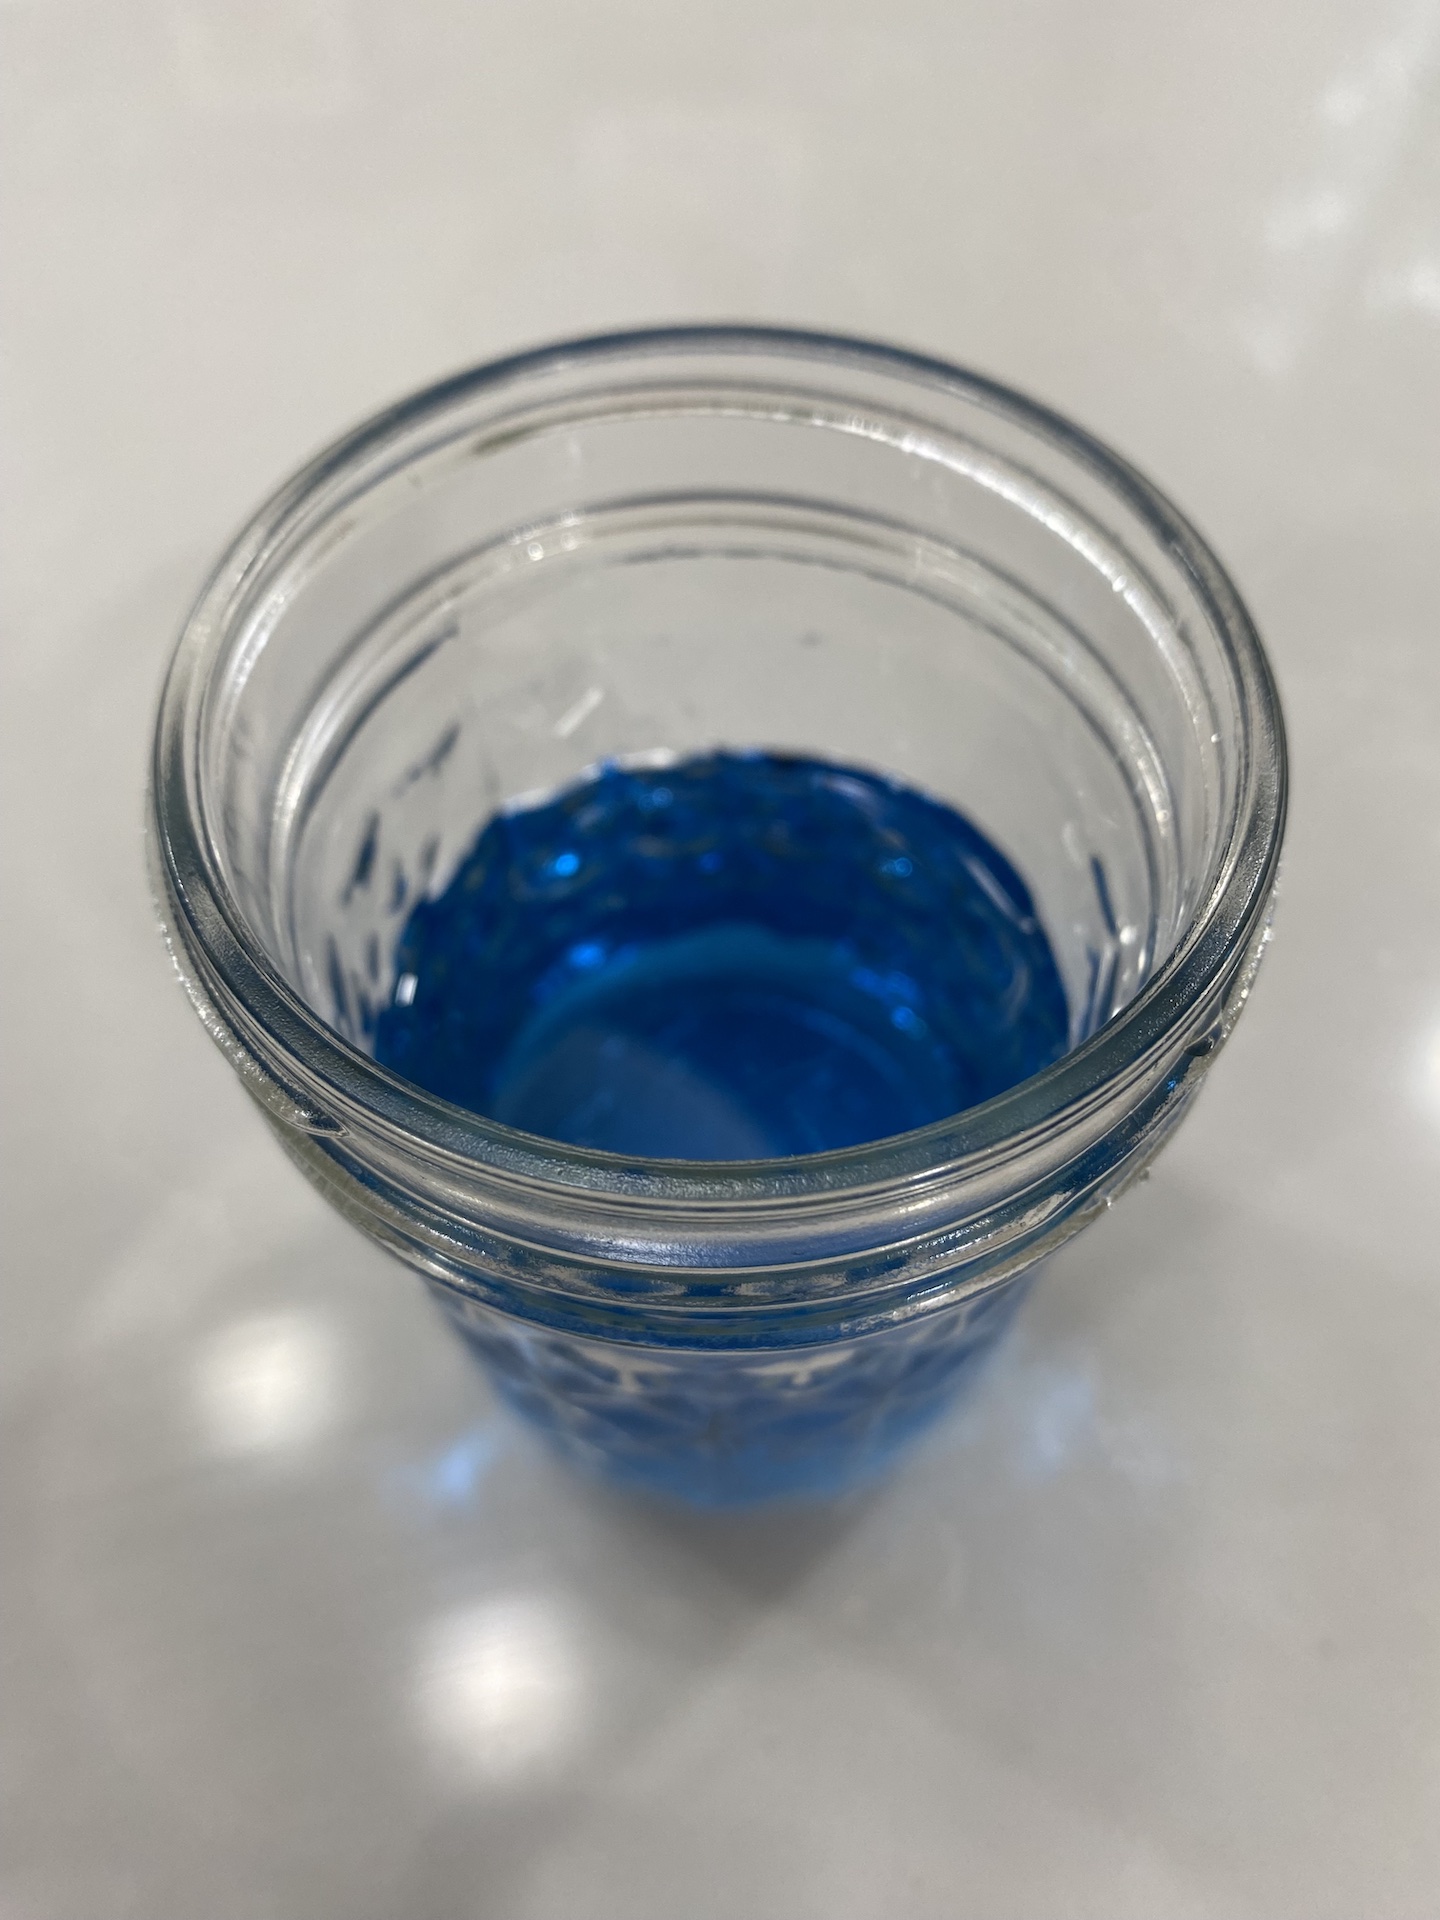
- To the glass jar, add 2 teaspoons (tsp.) of powdered dye, 1 tablespoon (Tbsp.) of salt and 1 cup of warm water. Mix the dye, salt and water thoroughly to form a concentrated dye solution, as shown in Figure 3.
- Wet all the fabric squares. Take three sealable plastic bags and place one square of every fabric type in each bag. Label the bags Batch 1, Batch 2 and Batch 3. Carefully pour the concentrated dye solution into the bags. Add an additional 1/2 cup of water to each bag and seal it, being careful to trap as little air as possible in the bag.
- Let the bags and dye sit for 20 minutes. Every couple of minutes, gently squeeze the bags to evenly coat all the pieces of fabric with the dye.
- While the dye and fabric are soaking, make your soda ash solution.
- Put 1 Tbsp. of soda ash in the plastic container. Add 2 cups of warm water and mix thoroughly. If hard pieces form, carefully break them up. When the solution is clear it should be ready to use.
- Caution: Make sure to wear your goggles and gloves when preparing and handling the soda ash solution.
- After the dye and fabric samples have soaked for together for 20 minutes, carefully open the plastic bags and add 1/2 cup of the soda ash solution to each bag. Reseal the bags, being careful to trap as little air as possible.
- Gently squeeze the bags to completely mix the soda ash, dye and fabric. Let the bags sit for one hour, gently squeezing every 10 minutes.
- After one hour, carefully dump the contents of the bag labeled Batch 1 into a sink and rinse the fabric until the water runs clear. Repeat this step for batches two and three.
- Caution: Make sure to wear your goggles and gloves during this step.
- Once the fabrics are well rinsed, do a final wash in the washing machine, using the textile detergent. This step is identical to Step 2 and will remove any final dye particles that are not bound to the fabric. Allow the samples to air-dry.
Collecting and analyzing your data
Your goal is to determine the effect, if any, of fabric type on the strength of the reaction between the fiber-reactive dye and the cloth. Below are two suggestions of how to collect and analyze your data. Try both. You might be able to think of additional ways to analyze the data, too.
Method 1: Look at all the fabric squares. Try grouping them by color. Make a data table, like Table 1 below, in your lab notebook. Write down the type of fabric(s) in each grouping, along with a description of the color.
- Do all the squares of a particular fabric type (for example, all three of the cotton fabric squares) belong in the same color grouping?
- Do color groupings contain more than one type of fabric?
- Have at least three other volunteers repeat Step 1 of this section. Record the data from them and compare it to your own visual groupings.
- How do your predictions compare to your results? Can you explain your results? Tip: In the Background tab, re-read the Introduction and review the resource list for information on the dye chemistry involved with different fabrics.
| Group # | Color description | Fabric types |
| 1 | Darkest shade | Cotton #1, Cotton #2 |
| 2 |
Method 2: Open the Color Picker tool. Use the vertical color slide bar to select the right color for your fabric samples. Then use your mouse to select the exact color from the large square (to the left of the slide bar) that matches one of your fabric samples. Once the selected color on your monitor matches your fabric sample, record the values for the hue (“H”), saturation (“S”) and brightness (“B”) (which are on the right side of the webpage) in a data table like Table 2 in your lab notebook. Repeat this step for all of the fabric squares.
- Calculate the average hue, saturation and brightness values for each type of fabric.
- Graph the averages on a bar chart, where the X-axis is fabric type and the Y-axis is the average value. You should have one graph for each type of value: hue, saturation and brightness. You can use paper or a website like Create a Graph to create your graph.
- Which fabric type has the highest average hue? What about saturation or brightness? Which has the lowest average value for each of these? Would you describe each of those as the most- or least-strongly dyed fabric type?
- How do your predictions compare to your results? Can you explain your results?
| Fabric type | Hue | Saturation | Brightness | |||||||||
| #1 | #2 | #3 | Average | #1 | #2 | #3 | Average | #1 | #2 | #3 | Average | |
| Cotton | ||||||||||||
| Linen |
Note: You might want to take pictures of the fabric squares for your science fair project display board.
Variations
- Before synthetic dyes were created, humans used natural dyes. Do some background research and pick one or more natural dyes to try in this project. Caution: Natural does not necessarily mean nontoxic. Be careful to pick safe dyes, like turmeric or berries.
- Some methods suggest pre-soaking the fabric in a soda ash solution and then adding dye (the reverse of the Experimental Procedure used in this project). Does the order of these steps make a difference in the color of the dyed fabric? Design an experiment to find out.
- You have likely seen how blue jeans fade gradually over time. There are many different experiments related to fading that you could try. For example:
- Do all fabrics fade equally with washing? Set aside one sample of each fabric type from your dyeing experiment. Then wash the other samples multiple times, comparing with the original sample after each washing. You can even take this further — does the wash temperature make a difference? Does dye color make a difference?
- Do all fabrics fade equally with exposure to sunlight? Set aside one sample of each fabric type from your dyeing experiment. Then expose the other samples to sunlight for different lengths of time. Keep track in your lab notebook. Compare the sun-exposed samples to each other and to the original, unexposed, samples.
- Some types of fabric are dyed better with a different pH than what is used in this science project. Specifically, by adding soda ash, which is sodium carbonate, you raised the pH of the dyeing solution, making it more basic. If an acid is used instead, the solution’s pH is lowered, making it more acidic. This can change how well different fabrics react with certain dyes. Read more about how the pH of a dye solution affects which types of fabrics it can dye and learn about acid dyes. Formulate a hypothesis and devise a way to test it. One common household acid you could use is vinegar, although there are several others that may work. For ideas, check out Science Buddies’ Acids, Bases and the pH Scale resource. Be sure to always find out and follow the necessary safety precautions for using different chemicals.
This activity is brought to you in partnership with Science Buddies. Find the original activity on the Science Buddies website.


