Experiment: Measure fake blood spatter
Compare the size of fake blood stains to the distance they fell

Forensic scientists analyze blood spatters to solve crimes. (This image shows a splash of red paint.)
Jose A. Bernat Bacete/Moment/Getty Images Plus
This is a human-written story voiced by AI. Got feedback? Take our survey . (See our AI policy here .)
The word forensic comes from the Latin word forensis, which means of or before the forum. “During the time of the Romans, a criminal charge meant presenting the case before a group of public individuals in the forum. Both the person accused of the crime and the accuser would give speeches based on their side of the story. The individual with the best argument and delivery would determine the outcome of the case. Basically, the person with the sharpest forensic skills would win. This origin is the source of the two modern usages of the word ‘forensic’ — as a form of legal evidence and as a category of public presentation.” (Wikipedia, 2008)
Today, the use of scientific evidence is so prevalent in the courtroom that the term forensics has become associated with forensic science. Forensic science is any science that is used in the courts or judicial system and it is extremely vital. The goal of a forensic scientist is to remain impartial and to appraise all of the available evidence in order to determine the truth.
Forensic science includes many areas of study, such as criminalistics, engineering science, pathology and biology. If a sports player were to die suddenly while playing a game, a forensic scientist with a specialty in pathology and biology would be called in to find out the cause. The scientist might have to perform an autopsy and examine the body to determine if the death had a natural cause — such as a health problem — or not. (To find out more about a related career, you can check out the Science Buddies career profile on pathologists.)
On the other hand, a forensic engineer may need to apply engineering principles to the purposes of law investigations. For example, a forensic scientist with specialty training as a civil engineer may study failure analysis and evaluate the quality of construction and manufacturing of structures involved in a crime or catastrophic event. They may look into why a particular car rolled over or why a building or bridge collapsed.
In general, to become a forensic scientist, you may need to study math, science and engineering. To find out more about being a forensic scientist, you can check out the Science Buddies career profile on forensic science technicians.
In this forensics science project, you will investigate how the size of blood spatter changes depending on the height that the blood was dropped from, but you will be using fake blood instead of real blood. In crime scenes where people are wounded, investigators apply principles of blood spatter analysis by taking measurements, such as of the diameter of the blood spatter, to figure out what happened. How do you think the diameter of the spatter changes as blood is dropped from different heights? Find out by trying your hand at collecting evidence in this science project and remember that solving mysteries is serious work!
Terms and concepts
- Forensic science
- Evidence
- Blood spatter analysis
Questions
- What is forensics?
- What are the different areas of study in forensic science?
- What kinds of projects do forensic scientists work on?
- How do you think the height from which something falls, such as a drop of blood, affects how it lands on the surface below?
Objective
To investigate how, in the field of forensic science, the size of blood spatter correlates to the distance from which the blood fell.
Resources
The following sources will help you learn more about forensic science:
- Wikipedia Contributors. (2014, March 24). Forensic science. Wikipedia: The Free Encyclopedia. Retrieved March 25, 2014.
- Wikipedia Contributors. (2014, March 22). Bloodstain pattern analysis. Wikipedia: The Free Encyclopedia. Retrieved March 25, 2014.
- Layton, J. (2008). How Crime Scene Investigation Works. Howstuffworks. Retrieved May 5, 2008.
Materials and equipment
- Digital scale (or you can use measuring spoons)
- Graduated cylinder, 50 mL or 100 mL size (or you can use measuring spoons)
- Cornstarch (17 g or about 2 tbsp)
- Corn syrup (60 mL or about 4 tbsp)
- Red food coloring (5 mL or 1 tsp)
- Bowl
- Water
- Fork or spoon for mixing
- Optional: Plastic wrap
- Cardboard. You will want enough cardboard to create seven pieces that are each about 30 cm by 30 cm (12 in by 12 in). The pieces should be able to lay flat and should not have many folds or creases in them.
- Scissors
- Pencil or pen
- Medicine dropper
- Measuring tape
- A chair or stepping stool
- Metric ruler or measuring tape that has millimeter marks
- A location to do your experiment where the ground can be easily cleaned (in case of spilling the simulated blood). For example, concrete or linoleum may work well.
- Optional: Butcher paper or newspaper
- Helper
- Lab notebook
Experimental procedure
Making the simulated blood
- Using the digital scale, weigh 17 grams (g) of cornstarch and place it into the bowl. (Or measure two tablespoons [tbsp] of cornstarch and add it to the bowl.)
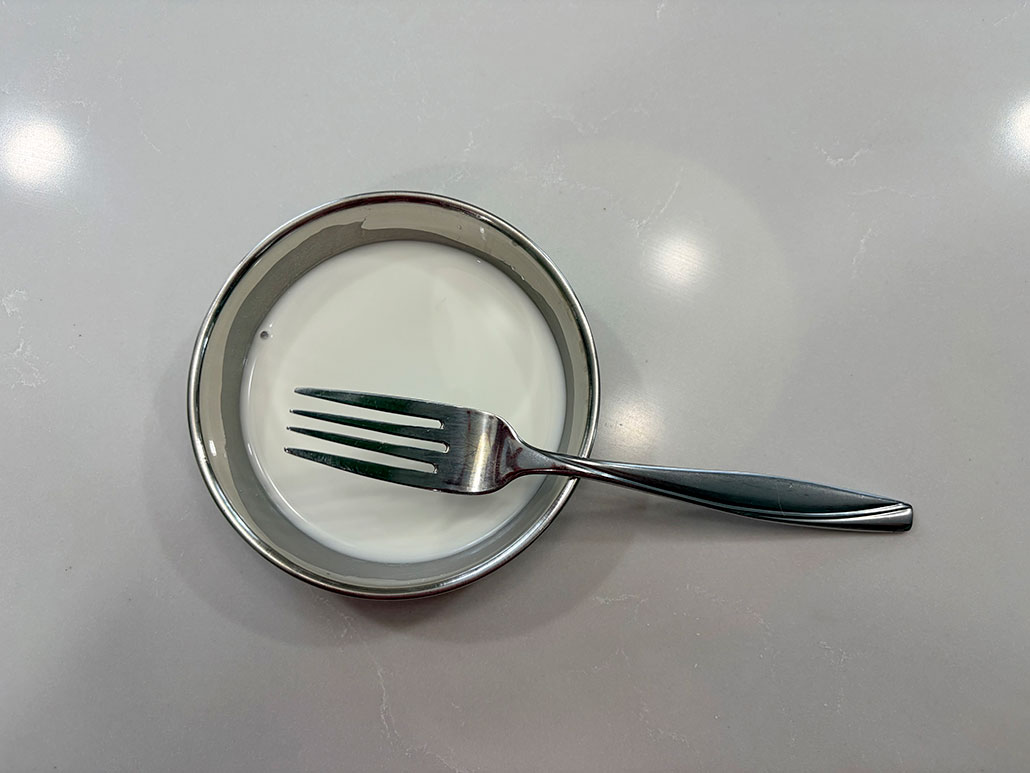
- Thoroughly mix 30 milliliters (mL; 2 tbsp) of water into the cornstarch with a fork or spoon. The mixture must be smooth, as shown in Figure 1 below.
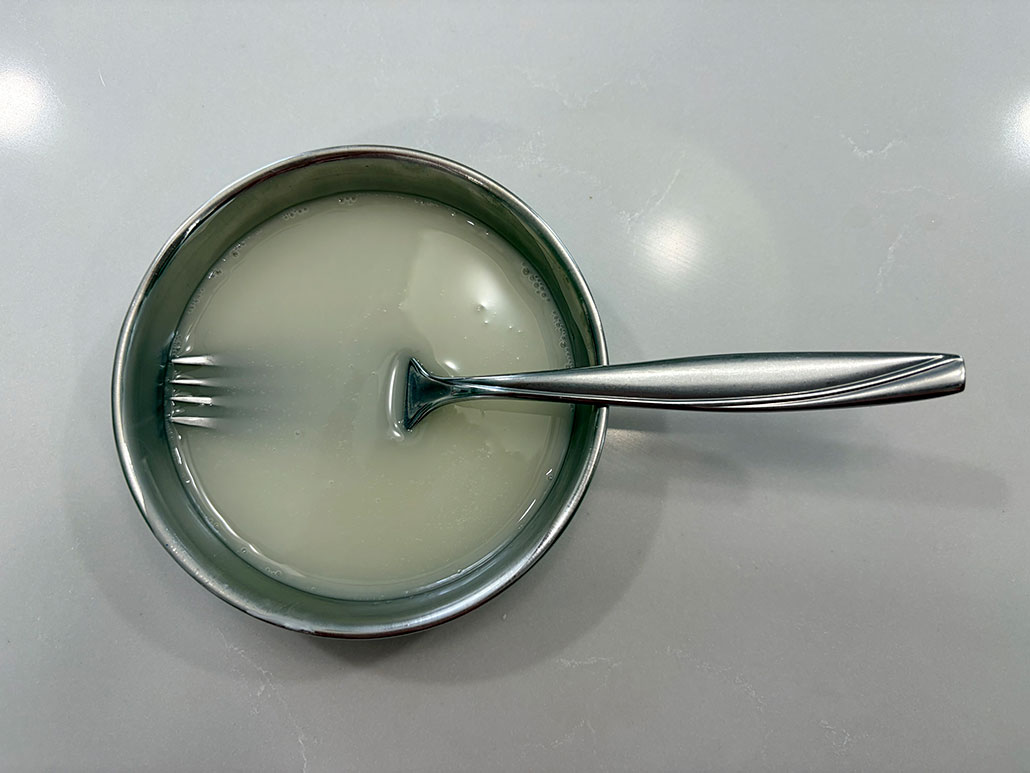
3. Add 60 mL (4 tbsp) of corn syrup to the bowl and mix thoroughly. The mixture should be smooth, as shown in Figure 2 below.
4. Mix in 5 mL (1 tsp) of red food coloring. Stir until the mixture is a consistent color, as shown in Figure 3 below.
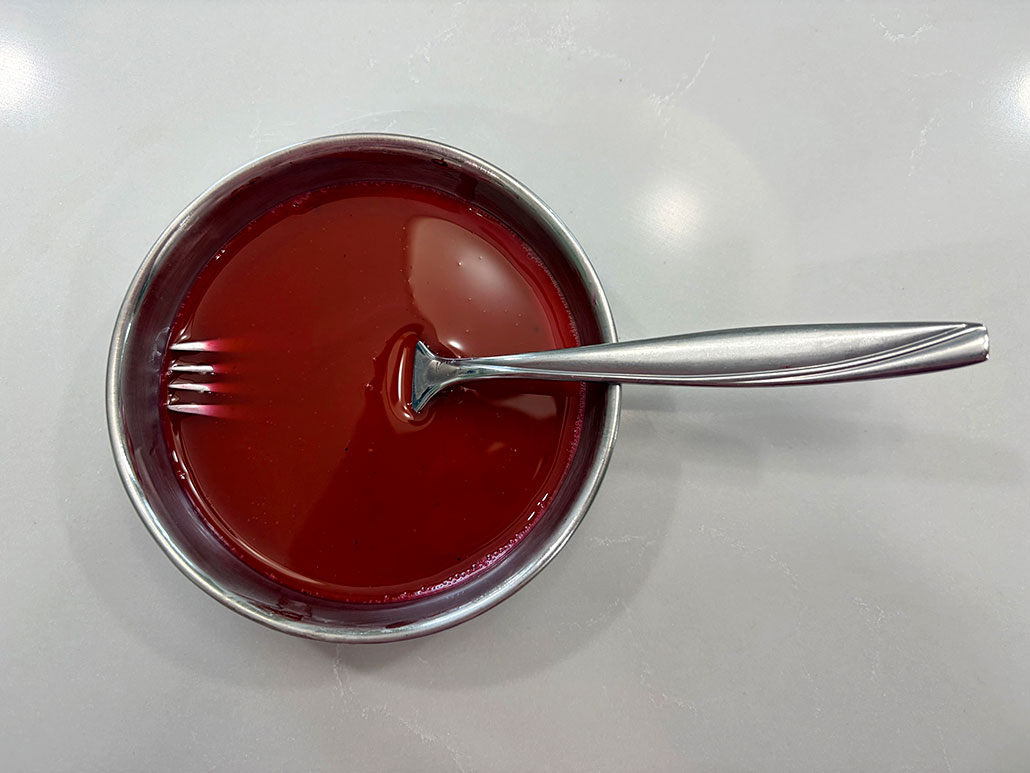
- You should now have a small bowl of simulated blood. If you will not be using it right away, cover the bowl with plastic wrap and set it aside.
- Note: Be careful not to spill the simulated blood on furniture or carpeting, as it can stain! If it does spill, be sure to clean up the simulated blood immediately.
Blood spattering
- Carefully cut up the cardboard into seven pieces of similar sizes. Each piece will be used for testing a different height.
- Each piece should be about 30 centimeters (cm) by 30 cm (12 inches [in] by 12 in). This will give you a good amount of space for dropping 10 drops of simulated blood onto each piece.
- Make sure the pieces can lay flat.
- Avoid using pieces with many folds or creases in them.
- Use a pencil or pen to label each piece of cardboard with the height you will be testing on it.
- The heights you will be testing are 30 cm (12 in), 60 cm (24 in), 90 cm (36 in), 120 cm (48 in), 150 cm (60 in), 180 cm (72 in) and 210 cm (84 in).
- Lay the cardboard piece you labeled for testing a height of 30 cm (12 in) flat on the ground where you will do your experiment.
- Because the simulated blood can stain, you should only do this experiment on a surface that can be easily cleaned, such as linoleum or concrete.
- You may also want to cover the surface (under the cardboard) with butcher paper or lots of newspaper to prevent stains.
- Fill the medicine dropper with some simulated blood and hold the dropper completely vertically above the cardboard piece, as shown in Figure 4 below. Have a helper use the measuring tape to make sure the tip of the dropper is 30 cm (12 in) above the cardboard.
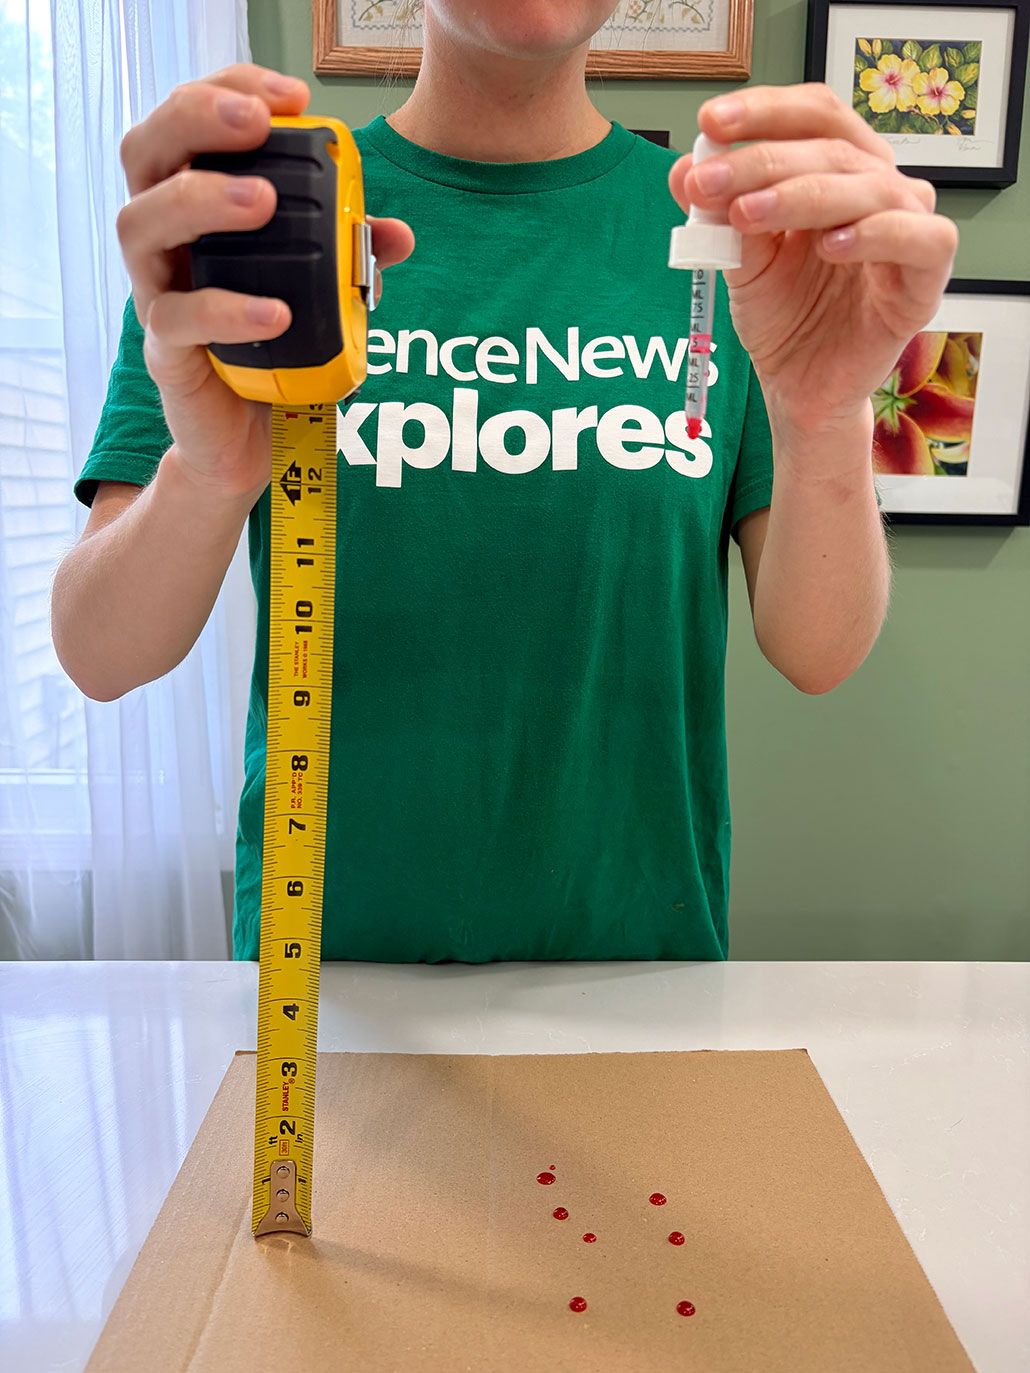
- Drop a single drop of simulated blood onto the cardboard piece.
- Repeat steps 4–5 nine more times so that you have dropped a total of 10 drops onto the cardboard piece. Then let the cardboard piece dry, being careful not to disturb the drops while they dry.
- If any of the drops landed on another drop or landed in a crease or fold on the cardboard, do not count these drops for your total of 10.
- Repeat steps 3–6 with all of your other cardboard pieces, being sure to test each from the correct height.
- You and your helper will need to stand on chairs or stepstools to reach the highest heights. Be careful when doing this.
- When all of the drops on the cardboard pieces have dried, measure the diameter of each drop — or spatter — in millimeters (mm) or inches (in) and record the measurements in your notebook in a data table like Table 1 below. Be sure to measure very carefully, because there may be very small, but measurable, differences between the drops. Tip: The drops may look glossy and wet even after they have dried. You may want to make an extra drop on one of the cardboard pieces that you can test (by touching it) to see when the drops have completely dried.
| Drop height (cm) or (in) | Drop | Drop diameter (mm) or (in) | Average drop diameter (mm) or (in) |
| 30 | 1 | ||
| 2 | |||
| 3 | |||
| … | |||
| 10 | |||
| 60 | 1 | ||
| 2 | |||
| 3 | |||
| … | |||
| 10 | |||
| 90 | 1 | ||
| 2 | |||
| 3 | |||
| … | |||
| 10 | |||
| etc. | etc. |
- Calculate the average diameter of the drops for each height. Add your answers to your data table.
- For example, if the 10 drops you measured at a height of 90 cm (36 in) had diameters of 12.5 mm (0.49 in), 12.0 mm (0.47 in), 12.5 mm (0.49 in), 13 mm (0.51 in), 12.5 mm (0.49 in), 13 mm (0.51 in), 12.5 mm (0.49 in), 12.0 mm (0.47 in), 13.5 mm (0.53 in), and 12.0 mm (0.47 in), the average drop diameter from a height of 90 cm (36 in) would be 12.6 mm (since the sum of all 10 drops is 125.5, and this number divided by 10 rounds to 12.6 mm (0.50 in).
- Make a graph of your results. On the x-axis, put the drop height (cm or in), and on the y-axis, put the average drop diameter (mm or in).
- Look at your graph and try to draw some conclusions based on your results.
- How did the diameter of the spatter change as the simulated blood was dropped from different heights?
- How do you think your results could help a forensic scientist figure out what happened at a crime scene?
This activity is brought to you in partnership with Science Buddies. Find the original activity on the Science Buddies website.